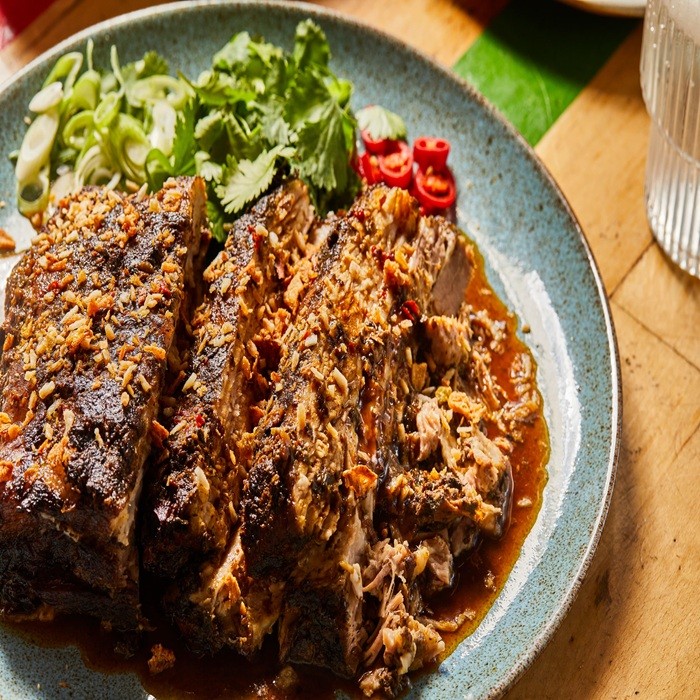
Blitz all the marinade ingredients in a food processor or with a hand blender. Lay the pork in a large dish, pour over the marinade, then turn the meat in the mixture, rubbing in the marinade all over and making sure every bit of the belly is coated. Cover the dish and leave overnight in the fridge. The next day, heat the oven to 140C (120C fan)/275F/gas 1. Lift the meat out of its marinade (don’t wipe off any that sticks to the joint, though; just leave most of the marinade behind in the dish) and transfer to a large roasting dish. Cover with foil, slip into the oven and roast for four and a half hours – every now and then (say, three or four times over the whole cooking period), take the dish out of the oven, lift off the foil lid and spoon the juices from the bottom of the dish over the meat. Return the foil lid, then put back in the oven. After the time is up, remove the foil, turn up the heat to 180C (160C fan)/350F/gas 4 and give the pork a final blast – after 15-20 minutes, the top will take on a lovely colour and the meat should be yielding and soft enough to cut with a spoon. To make crackling shards to serve with the meat, heat the oven to 200C (180C fan)/390F/gas 6 and line a roasting tray with baking paper. Lightly score the skin from the pork belly with a sharp knife, then rub it with a three or four fat pinches of salt – I also like to add a few caraway, cumin or fennel seeds at this point (use anything that takes your fancy). Cut the skin into long strips and lay these fat side down on the lined tray (you can, of course, leave it whole, but I think its pleasing to dress the plate with long, golden shards of crackling). Lay a second sheet of baking paper on top of the skin, then put a second baking tray of the same size on top, and roast for 45 minutes to an hour (if by this point the crackling has not gone crisp, just put it back in the oven and carry on roasting it until it has). Cut or pull the pork apart, top with finely chopped coriand

Heat the oven to 180°C. For the dough, mix flour and sugar in a bowl. Heat the 100 grams of milk to lukewarm and dissolve the yeast in it. Let stand for a while until it starts to bubble. Then add to the flour along with the coconut oil and mix into a smooth dough. Let rise for 30 minutes, covered, in a warm place. Meanwhile, make the rice pudding by putting the rice with sugar, milk and vanilla extract in a saucepan. Add the cardamom, star anise and cinnamon. Bring to a boil and cook, stirring constantly. Take out the spices. In a small bowl, mix baking soda with lemon juice/apple vinegar. Stir well until baking soda is dissolved, then mix into the rice pudding. Roll out the dough on a floured work surface (it is very sticky, but don’t stress it will be fine) and line the bottom and edges of a greased mold with it. Spread the rice pudding over the bottom and bake for about 25 to 30 minutes.

In a bowl, mix the flour, coconut milk, palm sugar and eggs and salt. Brush a waffle iron with oil pour in the batter and cook over an open fire until light brown and crispy.

Place flour in a bowl, and create a hole in the middle of the flour. Whisk eggs, and then pour whisked eggs into the well. Add milk, and combine. Then, stir in the ground walnuts, baking powder and cardamom, and add to the mixture. Fold ingredients into the mixture until it forms an elastic dough consistency. Take dough and with a rolling pin, roll out into a thin rectangle on a clean surface. Then, from the longest side of the rectangle, fold the dough into 3cm-wide lines, until the dough is fully rolled in a long line. Cut folded dough horizontally into 3cm pieces Heat a deep pan of the vegetable oil, and wait till it reaches frying temperature. Whilst you are waiting. Fill a deep pan with 1 litre of water, and bring to the boil. Then, pour in the sugar, and stir gently until it becomes thick and syrup-like. Turn down the heat and leave to simmer. Carefully lower each piece of dough into the frying oil. Fry until golden brown. When golden brown, take the Baghlaw pieces out of the oil, and place them into the sugar syrup to coat. Remove from the syrup and whilst still warm, sprinkle with ground walnuts, so they stick to the Baghlaw. Leave to cool. Then, enjoy with your friends and family!

Slice the onion and shallots thinly. Let them soak in a ice water bath while preparing the rest of the meal. Grate the coconut. Put in a large bowl. Add the coconut in a large bowl. Add the rice. Using your hands, mix the coconut and rice together. Roll the mixture to form 2-inch rice ball croquettes. Heat up the cooking oil in a pot or pan. Beat two eggs and a large bowl. Dip the balls into the egg mixture. Then, drop the balls into the cooking oil. Allow the balls to turn a dark amber brown color. Deep fry until crispy, crunchy, and golden. Remove and set on paper towel to drain excess oil. Once cooled, break apart the rice balls and add into a larger bowl. Drain the onion and the shallots. Make sure you tear the pork sausage up into small pieces. You can use a knife too, but the traditional method is tearing. In the large bowl, add in the onion, shallots, sour pork sausage, pickled garlic, lime juice, fish sauce, sugar, cilantro, hot mint, regular mint. Top with peanuts. Serve with Lettuce, dry chilli, and other fresh vegetables. Preserving Naem Khao Recipe Naem Khao can be kept in the refrigerator for 4 days. It can then be served chilled. It should not be frozen. Serving Naem Khao Nam Khao is generally served with lettuce leaves and a variety of different herbs like hot mint, mint, basil, and perilla.

Bring salted water to boil in a large pot. Add in the cabbage and potatoes, cook until tender about 30-40 minutes When tender, drain, very well. Return the vegetables to the pot and turn on the burner to low. Let steam Meanwhile cook up the bacon, reserving the fat for frying the hash. Chop up the bacon, into small pieces. Mash the potatoes and cabbage with a potato masher and add in the minced garlic. Add in salt and pepper to taste. Using a form for individual servings, press the hash mixture into the form with bacon on top, fry in the reserved bacon fat until golden brown, flip over and repeat on the other side. Remove form and garnish with chopped parsley. If you want to make one big hash, just use a skillet, pressing the hash into the skillet with the bacon pieces and reserved fat, then flip over once golden brown. Cut into servings. Garnish with chopped parsley.
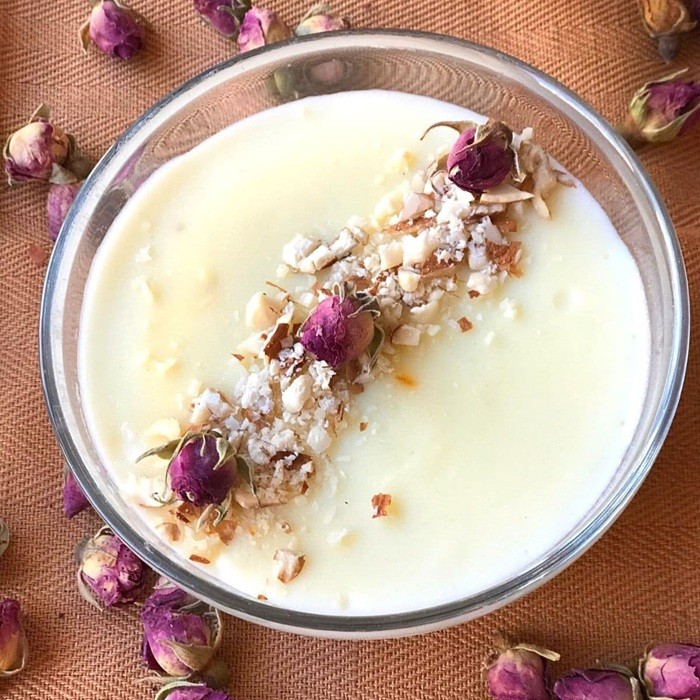
Pour 1 cup of milk into a small bowl, add the cornstarch and whisk them well until smooth. Pour the rest of the milk into a non-stick saucepan, adding the sugar and cardamom (and rosewater, if desired) whilst cooking over medium heat. Before it starts to boil, slowly add the milk and cornstarch mixture to the pan, whisking constantly to avoid lumps. Keep stirring until the mixture increases in thickness. Take the pan off the heat and pour into a large shallow serving bowl. Let it cool at room temperature, and then put in the refrigerator for about 1 – 2 hours. Finally, sprinkle your Firni with sliced almonds and pistachios and serve!

1 Prepare the Dough In a large mixing bowl add all the ingredients and mix together until a dough is formed. The dough should be stick - add extra flour if you find the mixture too sticky to work with. 2 Using the extra melted butter, rub some over your hands before breaking the dough into 20 equal sized pieces and roll each piece into a ball. Before rolling each ball rub melted butter over your hands each time. 3 Place the balls of dough onto a greased / lined baking tray 5cm apart - you will need to split the balls into two batches cooking one batch at a time. 4 Cooking Brush eat ball with beaten egg and place in the oven at 180 degree for 20 minutes. The Kurabie will be a light golden colour and slightly squishy in the middle. Place on a cooling rack to cool.
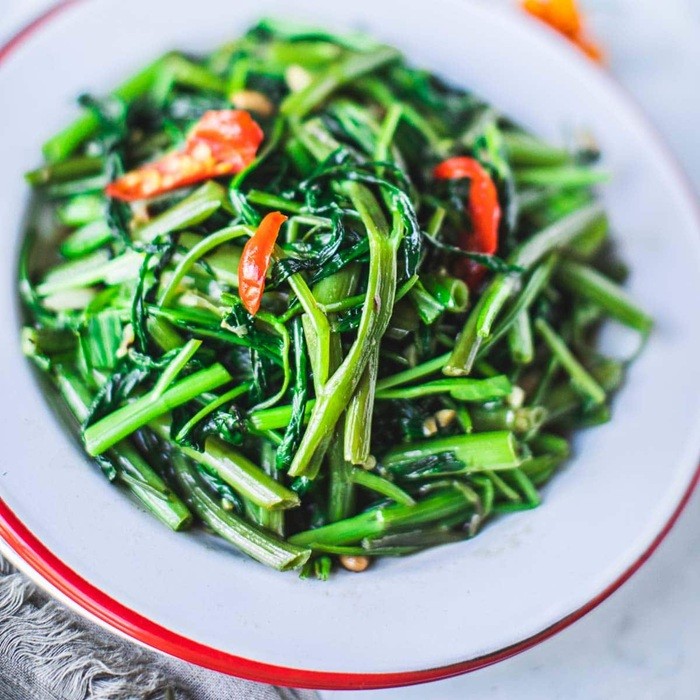
In a wok or large pan, heat 1 tablespoon of vegetable oil over medium heat. Once the oil is hot, add the garlic and stir-fry for about 30 seconds, until fragrant but not burnt. Add the minced pork to the pan and break it up with a spatula. Stir-fry until the pork is fully cooked and browned, about 2-3 minutes. Stir in the fermented soy beans and cook for another minute, mixing it thoroughly with the pork. Toss in the cut morning glory and stir-fry for 2-3 minutes to retain its bright green colour and crisp texture. Check the seasoning and adjust with fish sauce or sugar if needed. Transfer to a serving dish and serve immediately with steamed rice.

Preheat the oven to 180°C/350˚F (conventional oven). Place the softened butter and sugar in the bowl of a stand mixer and whisk until creamy. Add the flour and salt and knead by hand until you have a smooth dough. Divide into two pieces. Line the base of a square or round cake tin with baking parchment (not a springform tin) and place the first half of the pastry on top. Flatten with your fingers and a spoon. Using a teaspoon, sprinkle dollops of dulce de leche over the base. Sprinkle with the chopped chocolate and cover with the second half of the pastry. This is a bit trickier, but if you don’t get it right, don’t worry, it’ll be fine once it’s baked! Brush the pastry with the beaten egg. Bake in the oven for about 30 minutes or until golden brown. It will be wobbly. That's because butter cake only firms up when it cools. Cut into small pieces when it has cooled completely! Notes Storing: Store in an airtight container outside of the fridge for about 2-3 days or in the fridge for 5 days. Freeze for up to three months.
Take your puff pastry from the freezer and defrost. Sprinkle some flour on the kitchen counter. Stack the sheets of puff pastry on top of each other and roll them out with a rolling pin. You want those five sheets to end up being as thin as one sheet. Using a round or oval form press into the puff pastry and try to be as economical doing that as possible. You want to have as many cookies as you can. Mix the vanilla sugar with the cinnamon, cardemom and limezest in a little bowl Remove the flour from the counter and sprinkle with a bit of the sugar mix. Brush your puff pastry with a little bit of eggwash and than dip into the sugar mix and roll them softly to press the sugar in. Put your sugary puff pastry on a baking sheet (greased or with baking paper) and leave the dough to rest for about 20 to 25 minutes. this will make the cookies even crisper. Preheat the oven in the meantime to 180 C and put the baking tray in the oven. bake the cookies golden brown in about 25 minutes and make sure the sugar is caramelised nicely And voila, Girls from Arnhem with an Almeerse twist Voila, Arnhemse Meisjes met een Almeerse twist.
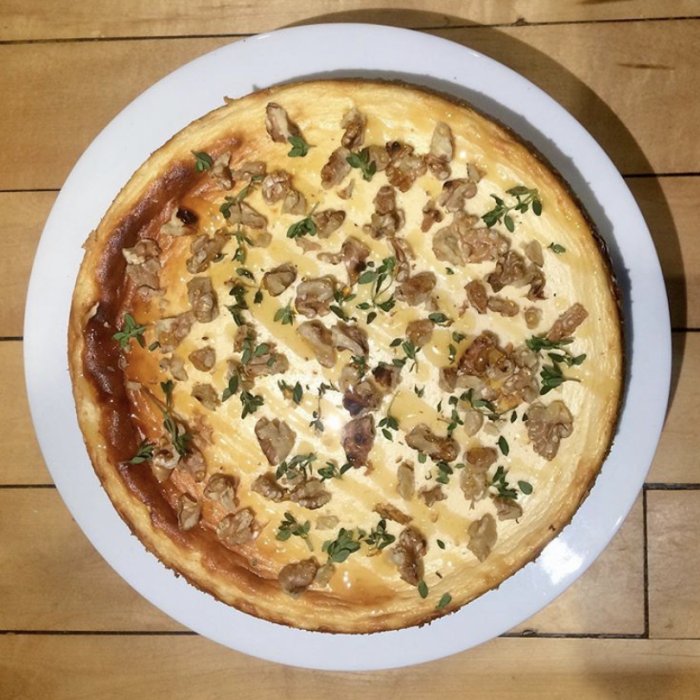
Heat oven to 160C/140C fan/gas 3. Crush the biscuits and most of the almonds inside a plastic food bag using a rolling pin. Mix with the butter, then press into the bottom of a deep, oval, 23cm dish (or something similar in size – a roasting tin, baking dish or cake tin will work). Bake for 10 mins until crisp. Stir or mash together the yogurt and mascarpone, then whisk in the eggs, one at a time. Stir in the lemon and orange zests, then stir in most of the honey, reserving about 3 tbsp. Spread over the biscuit base, cover loosely with foil and cook for 1 hr. Remove the foil and cook for 15 mins more until lightly golden and the top is firm with just the slightest wobble in the middle. Leave to cool. Can be kept in the fridge for up to 2 days. To serve, scatter with almonds, drizzle over the remaining honey, and hand around fresh fruit to go with it.

Place the dried yeast, milk and sugar in the bowl of your food processor. Mix and let stand for a few minutes until it begins to foam. Then add the flour, egg, butter, salt, 1 tsp of cinnamon and cardamom and process until smooth. Form the dough into a ball, cover the bowl and let it rise for 1 hour or until it has doubled in size. Mix the caster sugar with 1 tablespoon of cinnamon, pour over the dough and roll it in. Form 10 equal balls (about 75 grams each) and let them “sweat” for a while. The sugar will dissolve a little. When you roll them again later, the rest of the dough will absorb the sugar better. Then roll the ball into a strand about 35-40 centimeters long while rolling through the powdered sugar. Fold the strand around one end and tuck the other end under the bolus. Push something between the roll to secure the end. Place on a baking sheet lined with a baking sheet, cover with plastic wrap and let them rise for ½-1 hour. Meanwhile, preheat the oven to 250 degrees Celsius/480 Fahrenheit top and bottom heat Bake the Zeeland Boluses for about 8 minutes until done. Be careful – if you bake them too long, they will get dry and you will want something sticky 😉 . Let them cool out of the oven for 1 minute, then turn them over and let them cool further (on a wire rack if necessary). Enjoy!
Preheat the oven to 160˚C (320˚F) Line a cake pan with parchment paper and set aside. Mix all the dry ingredients together in a large bowl. Place the milk in a small saucepan and heat it until it is almost boiling but not quite. Pour the milk slowly into the dry ingredients while whisking. Don't overmix! As soon as it is combined to a smooth batter you pour it into the cake pan. Sprinkle the pearl sugar over the top and bake it in the oven for about 1 hour. Check after about 50 minutes how the cake is progressing. If a cake tester comes out clean the cake it cooked. If not let it cook for a little longer.

Dissolve yeast in warm water in 2 1/2-quart bowl. Add milk, sugar, salt, eggs, shortening and 2 cups flour. Beat on low for 30 seconds, scraping bowl constantly. Beat on medium speed for 2 minutes, scraping bowl occasionally. Stir in remaining flour until smooth. Cover and let rise until double, 50-60 minutes. (Dough is ready when indentation remains when touched.) Turn dough onto floured surface; roll around lightly to coat with flour. Gently roll dough 1/2-inch thick with floured rolling pin. Cut with floured doughnut cutter. Cover and let rise until double, 30-40 minutes. Heat vegetable oil in deep fryer to 350°. Slide doughnuts into hot oil with wide spatula. Turn doughnuts as they rise to the surface. Fry until golden brown, about 1 minute on each side. Remove carefully from oil (do not prick surface); drain. Dip the doughnuts into creamy glaze set on rack. Glaze: Heat butter until melted. Remove from heat. Stir in powdered sugar and vanilla until smooth. Stir in water, 1 tablespoon at a time, until desired consistency.
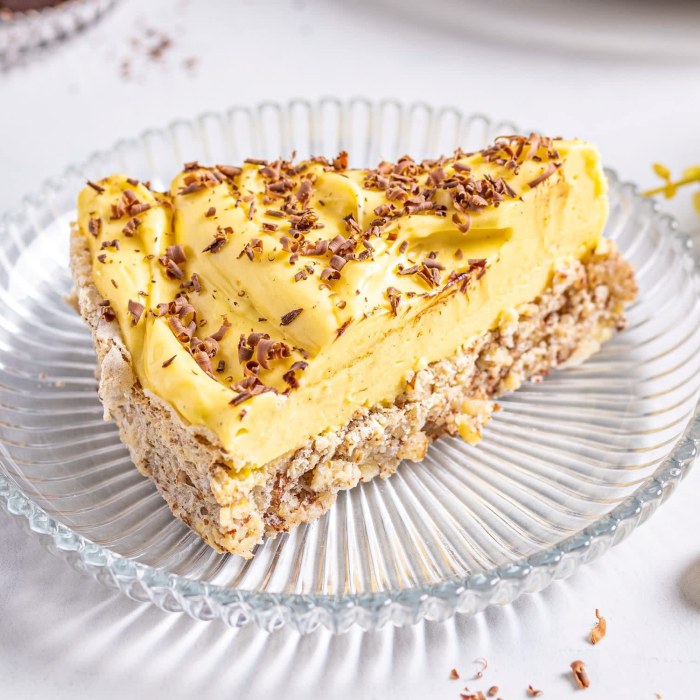
Almond base ▢ Preheat oven to 345°F (175°C) and grease cake form (I use a 27 cm spring form) – you can line the bottom with baking paper if you like. ▢ Grind almonds in an almond grinder or food processor. I like to keep them a bit coarse. ▢ Gently whisk the eggs and sugar together until combined (no longer). Stir in the ground almonds, flour, and baking powder. ▢ Pour batter into cake form and bake for about 45 – 50 minutes, monitoring to make sure the top doesn't burn. Yellow egg cream ▢ Add egg yolks, heavy cream, sugar, and vanilla to a saucepan. Heat over low/medium heat while stirring constantly until the mixture thickens – about 15 minutes. Turn up the heat if the mixture doesn't thicken, but be careful not to boil. ▢ Let the mixture cool to room temperature and then add the butter. You can use an electric mixer for a fluffy egg cream. Assembly ▢ Wait for the cake to cool completely before removing from form and frosting.
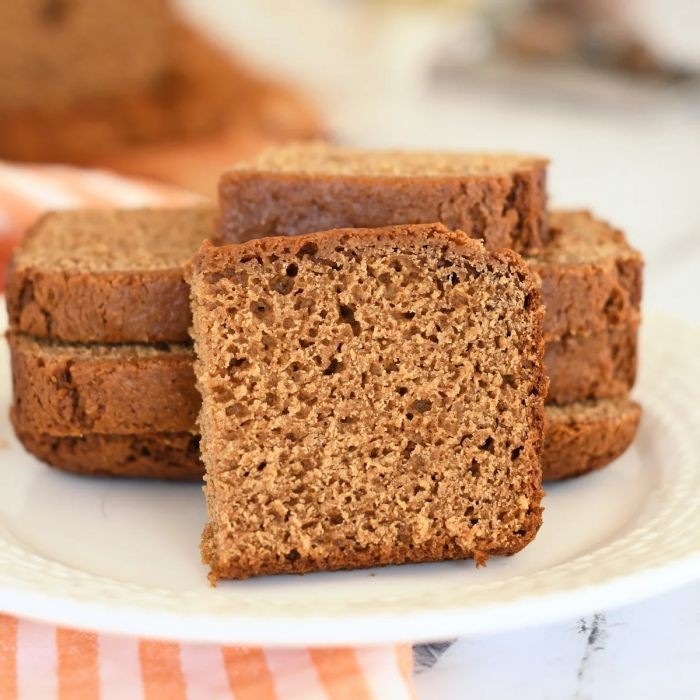
Heat oven to 160C/140C fan/gas 3. Grease a deep 22cm/9in square cake tin and line with baking parchment. Beat the egg and milk together with a fork. Gently melt the syrup, treacle, sugar and butter together in a large pan until the sugar has dissolved. Remove from the heat. Mix together the oatmeal, flour and ginger and stir into the syrup mixture, followed by the egg and milk. Pour the mixture into the tin and bake for 50 mins - 1 hr until the cake feels firm and a little crusty on top. Cool in the tin then wrap in more parchment and foil and keep for 3-5 days before eating if you can – it’ll become softer and stickier the longer you leave it, up to 2 weeks.
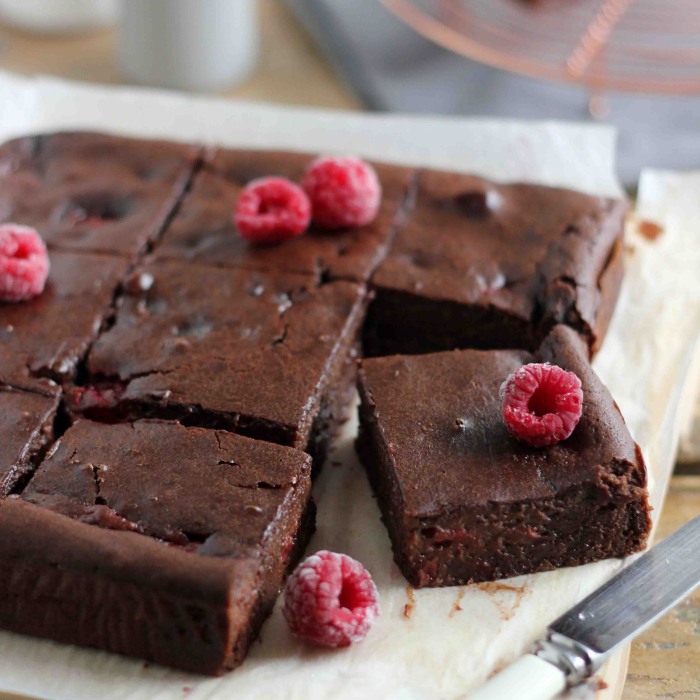
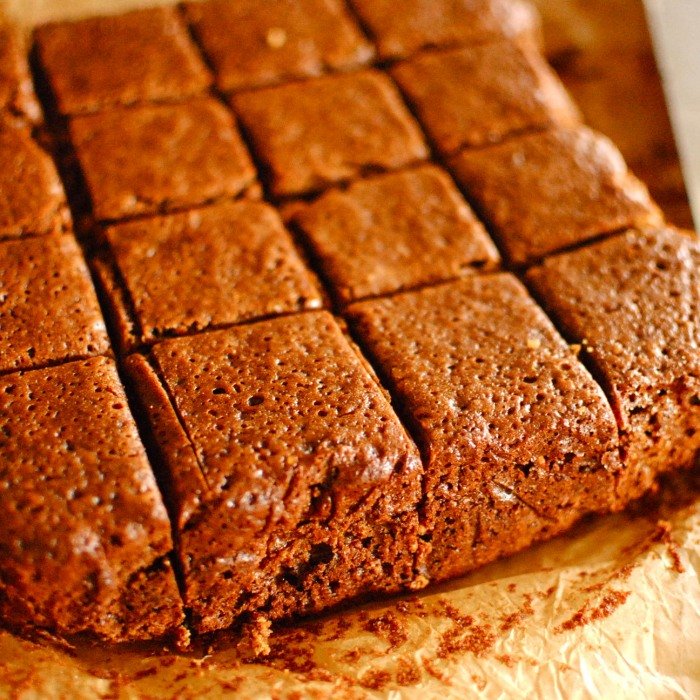
Heat oven to 180C/160C fan/gas 4. Line a 20 x 30cm baking tray tin with baking parchment. Put the chocolate, butter and sugar in a pan and gently melt, stirring occasionally with a wooden spoon. Remove from the heat. Stir the eggs, one by one, into the melted chocolate mixture. Sieve over the flour and cocoa, and stir in. Stir in half the raspberries, scrape into the tray, then scatter over the remaining raspberries. Bake on the middle shelf for 30 mins or, if you prefer a firmer texture, for 5 mins more. Cool before slicing into squares. Store in an airtight container for up to 3 days.

step 1 Pour 230ml lukewarm water into a bowl and add the yeast. Leave to stand for 3 mins, then add the caster sugar, eggs, flour and 1 tsp sea salt flakes. Mix together to form a dough, then knead for 10 mins in stand mixer using a dough hook (or 15 mins by hand) until the dough is elastic enough to be almost see-through when stretched. Cover and set aside to rest for 30 mins, then cut into four equal pieces. Transfer to a baking tray lined with baking parchment. Leave to rest for another 30 mins. step 2 Oil the work surface and a rolling pin with vegetable oil. Working with one portion of dough at a time, flatten it against the surface using the palm of your hand, then roll it out into a thin rectangle, about 30 x 50cm. Let it rest for 2 mins while you spread a quarter of the lard over the top. (If you want to fill your pastry with sobrasada de Mallorca, mix 50g lard with the sobrasada, and spread this over the dough instead.) Pull one corner of the flattened dough and stretch it out as far as it will go without breaking. Repeat every 10cm or so around the dough rectangle in every direction until it reaches about 50 x 70cm. step 3 Cut a strip from each of the shorter sides and lay these beside each other along one of the longer sides of the rectangle; this is what we call the heart of the ensaimada. From there, begin rolling the dough until you have a long pastry snake. Repeat with the remaining portions of dough. step 4 Take the first roll of dough and stretch it until it is over a metre long. Then, roll it up into a spiral, leaving 1cm between each turn of the spiral so the dough can expand. Flatten a little and transfer to a baking sheet lined with baking parchment. Repeat with the remaining dough. Leave to rise in a warm place for at least 12 hrs, or ideally 24 hrs. step 5 Heat the oven to 200C/180C fan/gas 6. Put the ensaimadas in the top third of the oven and immediately reduce the temperature to 180C/160C fan/gas 4. Bake for 18 mins until d
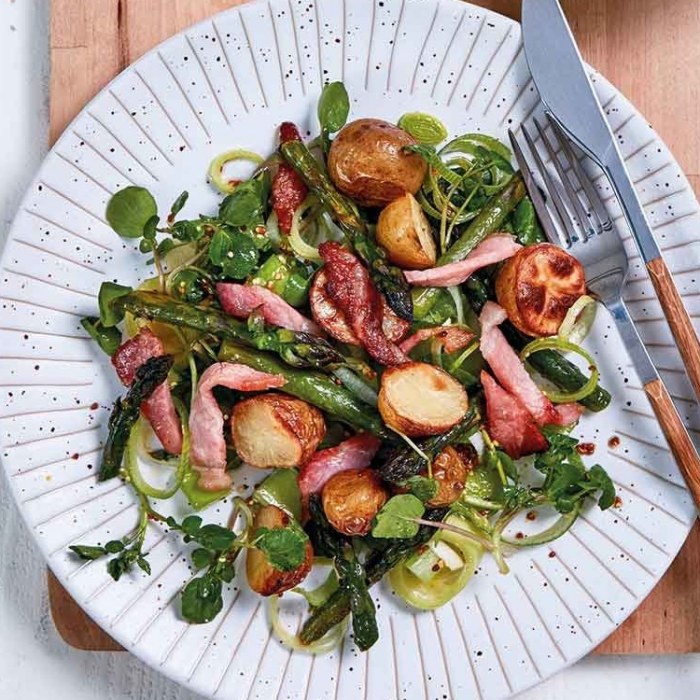
step 1 Preheat the oven to 200C/Gas 6/fan 180C. Snap off the woody ends of the asparagus and discard. Arrange the asparagus in a single layer in a baking tray with sides. Cut the tomatoes in half widthways, nestle them in with the asparagus, season with sea salt and pepper and drizzle with olive oil. Roll each bacon rasher into a tight roll (if large, first cut in half crosswise), and arrange in the tray. Drizzle the bacon rolls with the honey and bake for 20 minutes until the tomatoes are soft and the bacon is crisp. step 2 In the meantime, boil the potatoes until tender. Whisk the vinegar, olive oil, mustard, some sea salt and pepper in a large bowl until blended. Toss the rocket or spinach leaves in half of the dressing, and arrange on a large serving platter. step 3 Drain the potatoes and cut in half. Gently toss them in the rest of the dressing, and arrange on the platter with the asparagus. Tuck in the tomatoes and bacon.

step 1 Prepare the noodles following pack instructions, then drain and set aside. Combine all the ingredients for the sauce in a small bowl or jug, and set aside. step 2 Heat the oil in a large wok or frying pan over a high heat and stir-fry the garlic and chilli for 20 seconds until just starting to turn golden. Add the steak and stir-fry for 1 minute until seared and starting to brown. Add the broccoli and stir-fry for another minute, then tip in the noodles and add the sauce. Stir-fry for another 1-2 mins until well combined and piping hot. step 3 Stir through the basil and turn off the heat. Serve immediately to avoid overcooking.

▢ Whisk the egg and sugar until the mixture thickens. ▢ Melt the butter and let it cool slightly, then add the butter to the egg mixture. ▢ Mix in spices and then slowly add the flour while stirring to avoid lumps. ▢ Let the batter rest for at least 30 minutes. This improves the texture of the krumkaker. ▢ Spoon about one heaping tablespoon of batter onto iron and bake. If the batter is too thick, add some water to it. ▢ While still hot, shape the krumkake with a wooden krumkake roller or over a cup (if using a cup, make them a bit thicker). The krumkaker harden quickly, so you can just let them sit on the roller/cup until the next krumkake is ready to be shaped. ▢ After completely cooled, store the krumkaker in a metal or glass tin lined with paper towels at the bottom. You can also freeze them!
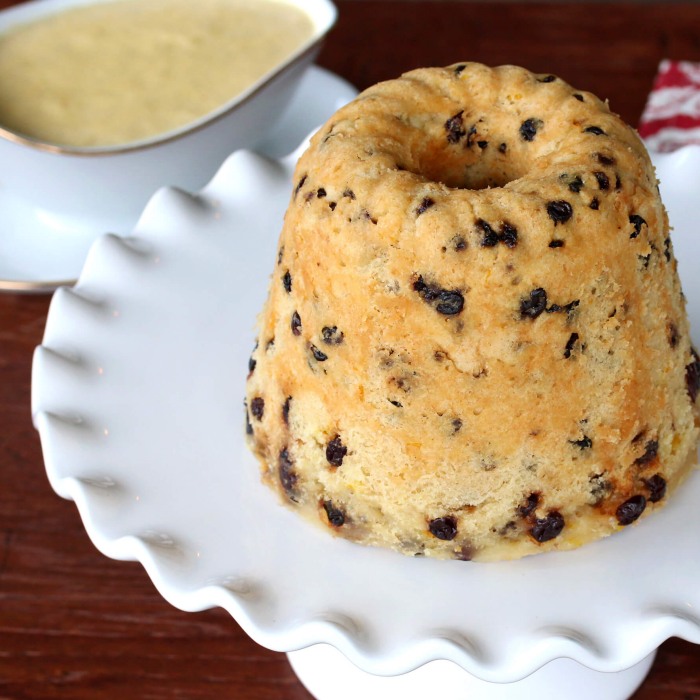
Put the flour and salt in a bowl. Add the suet, currants, sugar, lemon and orange zest. Pour in 150ml milk and mix to a firm but moist dough, adding the extra milk if necessary. Shape into a fat roll about 20cm long. Place on a large rectangle of baking parchment. Wrap loosely to allow for the pudding to rise and tie the ends with string like a Christmas cracker. Place a steamer over a large pan of boiling water, add the pudding to the steamer, cover and steam for 1 1/2 hours. Top up the pan with water from time to time. Remove from the steamer and allow to cool slightly before unwrapping. Serve sliced with custard.
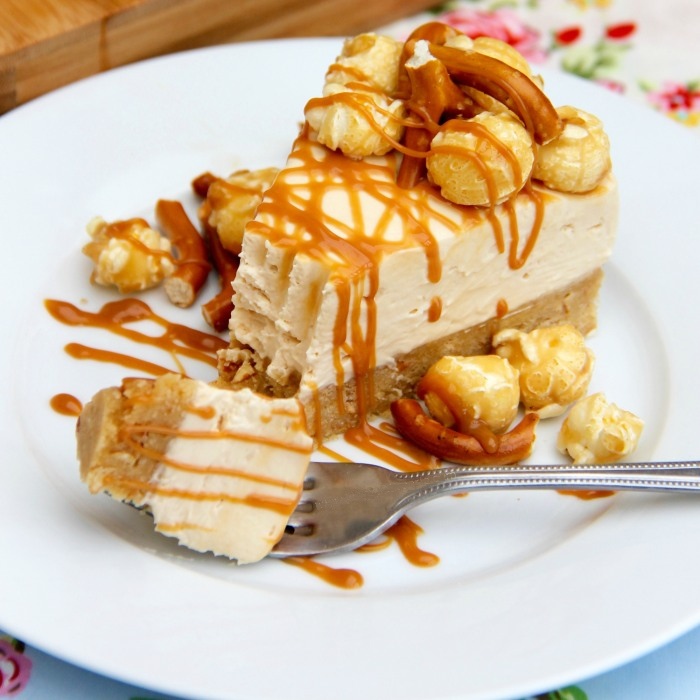
1) Blitz the biscuits and the pretzels in a food processor and mix the biscuits with the melted butter. Spread on the bottom of an 8″/20cm Deep Springform Tin and press down firmly. Leave to set in the fridge whilst you make the rest! 2) Using an electric mixer, I use my KitchenAid with the whisk attachment, whisk together the cream cheese, vanilla, and icing sugar until smooth and then add the caramel and whisk again until smooth and lump free – this could take a couple of minutes, I whisk it at half speed so not too quick or slow! 3) Pour in the double cream & Salt flakes and continue to whisk for a couple of minutes until its very thick and mousse like (I mix it on a medium speed, level 6/10) – Now this could take up to 5 minutes depending on your mixer, but you seriously have to stick at it – it will hold itself completely when finished mixing (like a meringue does!) If you don’t mix it enough it will not set well enough, but don’t get impatient and whisk it really quick because that’ll make it split! Spread over the biscuit base and leave to set in the fridge overnight. 4) Remove the Cheesecake from the tin carefully and decorate the cheesecake – I drizzled over some of the spare caramel, and then some Toffee Popcorn and more Pretzels!